The Hero Arts My Monthly Kit for August arrived and I was anxious to have some fun with it. The fancy frame die included this month kit was an immediate favorite. This die alone makes the price a bargain in my mind. When I saw this Youtube video from Jennifer McGuire, I was inspired and ready to challenge myself to make an inside tunnel card.
From the outside the card is sorta fun. I used a border die from Simon Says Stamp, the DOT SCALLOP BORDER Wafer Die, to make my scalloped background layer. All of the stamps I used here are included in this month's kit. I colored the cups with my copic markers and die cut them using the coordinating dies in the kit. Then, I coated them with VersaMark embossing ink and used a clear embossing powder to give them a glossy finish.
The MAGIC happens when you open the card to the inside tunnel. I followed the tutorial from Jennifer but made my card but made a few modifications to create this version. I typically make my cards A6 size. This size uses a base of 6"X 9" as opposed to your the commonly used A2 size base of 5 1/2" x 8 1/2". You will still cut two base cards and cut off 1/2" from the edge of one of the 6"X 9" base cards and the score line will be at 4 1/2". The second base card will be scored at 1/2", 4 1/2",and 5". The inside tunnel panel is cut to 4 1/2" by 6", you will need to cut a sliver off the 4 1/2" edge. then score it at 1/4" on both sides. I used the fancy frame die to cut the first layer of my tunnel. I cut the frame die a second time from a piece to scrap so that I could use just the table and chairs parts for my cafe scene. To make an opening for the inside tunnel layer, I used a Die-namics Inside & Out Stitched Rounded Rectangle an lined it up like a window to my cafe.
I added just a touch of coloring to the inside of the tunnel using Distress Oxide Inks, TUMBLED GLASS and ICED SPRUCE. I added the extra tables to the back side of my inner layer and stamped the sentiment from the kit using the Iced Spruce Distress Oxide ink.
Sounds complicated but it was such fun and worth the effort. I know this because I am ready to do it again soon.
Thank you for dropping by my blog. Your comments, questions and suggestions are always very welcome.
Saturday, August 18, 2018
Tuesday, July 17, 2018
Summer Memories
The the latest My Monthly Hero Kit brings me back to my childhood. I grew up in a very rural area in central Missouri, over a 100 miles from either Kansas City or St. Louis. The traveling fairs that would set up in our small town for a few days were a huge event that we looked forward to each summer. They meant carnival rides, cotton candy, games and usually fireworks for the 4th of July.
For the third card I used inside cut from the frame die to make my border piece. The die that I used to cut my image panel from Bristol Paper is from Gina K Designs, Rectangle SM Set Double Stitch . The coloring for this one done using watercolors.
I added embellishments to the first card with Tonic SILVER MOONDUST Nuvo Glitter Drops and to the third care with Studio Katia CUPID'S KISS Crystals.
I will be entering my cards in the current challenge with A Blog Named Hero. The challenge this month is Birthday Cards.
Thank you for dropping into my blog. Your comments, questions and suggestions are always welcome.
This one uses the stamps from the kit and a red, white and blue theme. I put the image on a tag die from Tim Holtz Framelits Tag Collection 658784 that I shorten by about an inch. I used the inks from the kit and added only a few touches of red and yellow coloring with ZIG Markers.
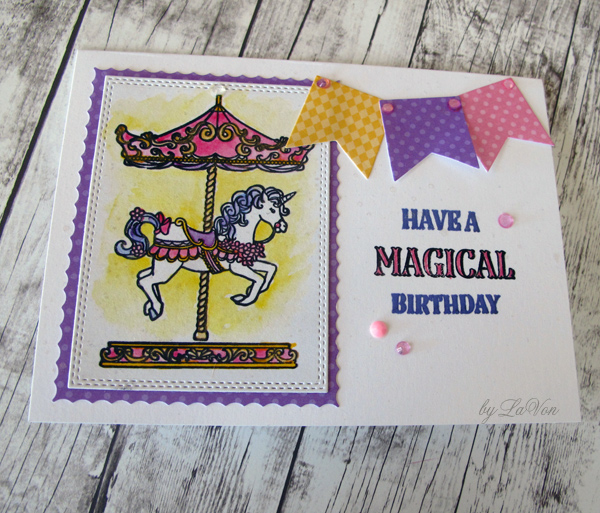
My second card is shaker card that I made using an add on set from the Hero Arts July release, "Ornate Carousel" Cm296. The frame is from a die that I purchased a while back from Amazon and it looks like it is no longer available. Any square die set could work. The coloring of the carousel horses was done with the Zig Markers, but I used some Copic markers in the greys and blue to add the floor and sky.
For the third card I used inside cut from the frame die to make my border piece. The die that I used to cut my image panel from Bristol Paper is from Gina K Designs, Rectangle SM Set Double Stitch . The coloring for this one done using watercolors.I added embellishments to the first card with Tonic SILVER MOONDUST Nuvo Glitter Drops and to the third care with Studio Katia CUPID'S KISS Crystals.
I will be entering my cards in the current challenge with A Blog Named Hero. The challenge this month is Birthday Cards.
Thank you for dropping into my blog. Your comments, questions and suggestions are always welcome.
Saturday, June 23, 2018
Beach Time!
The card I am sharing today was made using the June My Monthly Hero Kit and an add on set to create a fun beach scene. I think this is a perfect card to celebrate the first day of summer and to enter in the current challenge titled "Summertime Fun" over at A Blog Named Hero. I am also adding this one the Simon Says Stamp Wednesday Challenge. The theme is "Bright and Cheerful" and the highlighted product line this week happens to be Hero Arts.
Here is a picture taken with him wearing his "Doggles" making the trip down to the Dog Beach in Chicago where he will swim and fetch until he has exhausted himself.
Hope you all enjoy your summer as much as Rory.
Thank you for visiting my blog. Your comments are always very welcome.
Sadly, the June My Monthly Hero Kit is sold out but the add-on set "Beach Please Stamp and Cut DC238 that I used for this card is still available. As you might see I had a lot of fun creating this summer fun card. The beach embossing powder that was part of the monthly kit was perfect for creating the sandy beach scene. Everything here was from Hero Arts with the exception of the "Stitched Banner" die from SSS and my copic markers used for coloring the image.
Our dog Rory's favorite thing in the world is a trip to "the sandy place". That for us is a beach on the shore of Lake Michigan. We don't dare say the word "beach" in his hearing because he knows what the word means and just get super excited.Here is a picture taken with him wearing his "Doggles" making the trip down to the Dog Beach in Chicago where he will swim and fetch until he has exhausted himself.
Hope you all enjoy your summer as much as Rory.
Thank you for visiting my blog. Your comments are always very welcome.
Monday, June 18, 2018
Frame It
The card I am sharing today is a clean and simple one that I made to add to this weeks Simon Say Stamp blog Wednesday Challenge. This weeks challenge is "Frame It" and the feature product suggestion is Memory Box.
The butterfly focal point of my card is "Vivienne Butterfly" by Memory Box. I cut the die twice from Therm O Web PEELNSTICK TONER SHEETS and foiled the butterfly die using Gina K Designs SPARKLING SILVER Fancy Deco Foil with my MINC Machine. This die is a mirror image so that I could peel off the backing and stick the two dies back to back giving silver foil color to both sides. In keeping with the "Frame It" theme, I used Gina K Designs DOUBLE STITCH RECTANGLE die to frame my butterfly and a sheet of repeat rectangle patterned paper from a previous SSS Monthly Card Kit. I used a stencil brush and Hero Arts Dandelion ink to apply a light touch of color behind the butterfly. The sentiment is from SSS "Messages for Everyday" and the die I used is SSS "Stitched Banners". The embellishments are Little Things From Lucy's Cards RAINBOW SPARKLE Jewels.
Thank you for dropping in to check out the details of my card. Your comments, questions and suggestions are always welcome.
The butterfly focal point of my card is "Vivienne Butterfly" by Memory Box. I cut the die twice from Therm O Web PEELNSTICK TONER SHEETS and foiled the butterfly die using Gina K Designs SPARKLING SILVER Fancy Deco Foil with my MINC Machine. This die is a mirror image so that I could peel off the backing and stick the two dies back to back giving silver foil color to both sides. In keeping with the "Frame It" theme, I used Gina K Designs DOUBLE STITCH RECTANGLE die to frame my butterfly and a sheet of repeat rectangle patterned paper from a previous SSS Monthly Card Kit. I used a stencil brush and Hero Arts Dandelion ink to apply a light touch of color behind the butterfly. The sentiment is from SSS "Messages for Everyday" and the die I used is SSS "Stitched Banners". The embellishments are Little Things From Lucy's Cards RAINBOW SPARKLE Jewels.
Thank you for dropping in to check out the details of my card. Your comments, questions and suggestions are always welcome.
Saturday, June 9, 2018
June Wedding Bells
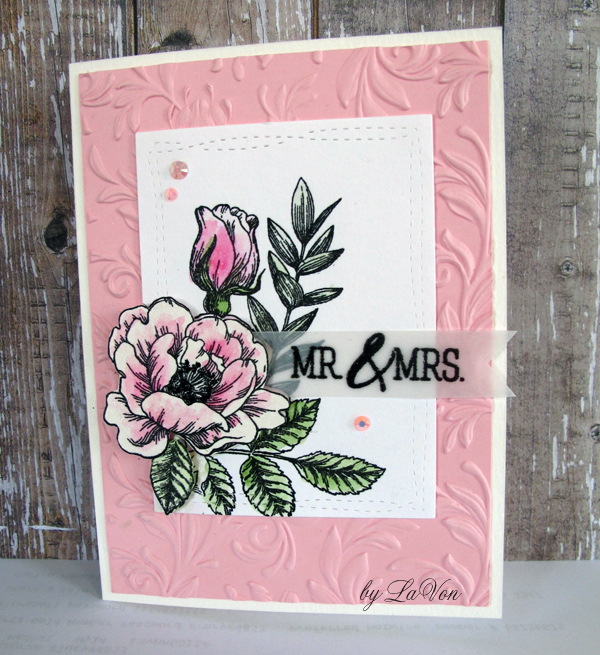
The theme for the current SSS Wednesday Challenge is Weddings and Anniversary Cards. We attended a wedding last weekend and realized that I have used all the wedding cards that were in my card stash. Great timing for me to create two new cards using the "Beautiful Flowers" stamp set that came in the June Monthly card kit. As usual the kit is sold out by now but many of the products from the kit are still available.
For this card I used just one of the corners of the larger floral spray and stamped the smaller matching flower to pop up. The coloring is done using my ZIG Markers and the die I used here is from Avery Elle WONKY STITCHES Set. The sentiment from SSS CONGRATULATIONS is stamped using Tsukineko VersaFine ONYX BLACK Ink on vellum and heat embossed with clear embossing powder. The background embossed panel is done using the one of the new Tim Holtz Sizzix 3D Texture Fades Embossing Folders. This is the one that was included in the June kit called "BOTANICAL". The gem ewmbellishmenets are Studio Katia CUPID'S KISS Crystals.
My second card has probably my favorite of the pair. The silver embossing is very pretty in person. For this card I stamped the larger image for the "Beautiful Flowers" set with VersaMark directly onto one of the patterned papers from ModaScrap FLY AND SCRAP 6x6 Paper that was in the June Kit and heat embossed using Ranger Embossing Powder SUPER FINE SILVER Detail. I again used my Zig Markerand a waterbrush to add the coloring. The sentiment is from SSS CONGRATULATIONS and embossed in the SUPER FINE SILVER Detail embossing powder. The sequins are from my stash.
Thank you for dropping by to check out my blog. Your comments, questions and suggestions are always welcome.
Sunday, June 3, 2018
Feel Like I Can Fly
The card I am sharing today is for the Simon Says Stamp Flickr group Challenge 98. Guest designer Isha has challenged us to use embossing on our card. She has created several beautiful samples in the discussion thread for the challenge.
For my embossing I used the "Butterflies" stencil from the April Card Kit of the Month and modeling paste. The kit is sold out but, this stencil is still available for purchase.
I began this card with the stamping and coloring of the flowers from the Simon Says Stamp background cling stamp called CENTER CUT FLOWERS . I used just the outer border and inked up only one side of the stamp. The coloring was done with Zig Markers.
For my stenciled butterflies, I used Crafter's Workshop LIGHT AND FLUFFY MODELING PASTE. Before applying it to the stencil, I added color to the modeling paste by placing it on my craft sheet and using a palette knife to mix in coordinating inks . By adding a little ink you can get almost any color from the single paste. The sentiment comes from the stamp set from Simon Says Stamp called "BEAUTIFUL DAY".
I wish you all a beautiful day and thank you for stopping by. Your comments, questions and suggestions are always welcome.
Tuesday, May 29, 2018
More Coffee PLEASE!
I decided to get out one of my favorite stamp sets to make this fun card for this weeks Wednesday Challenge with Simon Says Stamp. This weeks challenge was to use more than one stamp and the suggested product was Honey Bee Stamps.
The stamp sets I used were "BLAH BUNNY" and "BLAH BLAH BLAH" both by the Honey Bee stamps company. I stamped the image using masks that I had already created for this set and saved from a previous card. I colored the image using Zig Clean Color Markers and die cut it using a stitched rectangle die. The enamel dots and patterned paper are from my stash.
Thank you for dropping in to check out my card. Your comments, questions and suggestions are always welcome.
Subscribe to:
Posts (Atom)