Monday, September 9, 2019

Simon Says Stamp Sept. Card Kit


Today I am sharing two versions of a card I created using the September Card Kit of the Month from Simon Says Stamp.  At the date of this post the kit is still available.

The card on the left is stamped using Gina K amalgam Obisidian ink on Neenah Solar white. The card on the right is stamped on watercolor paper using Gina K amalgam Whisper ink . Coloring on the red card is Copic Markers while the pastel card uses Distress Inks as a watercolor.    


Supplies:

Stamps:  Simon Says Stamp

Ink:  Gina K Designs    Amalgam "Obsidian"    Amalgam " Whisper"          

Ranger Distress Oxide Ink  "Tumbled Glass"   "Antique Linen"   "Old Paper"  

                                          "Shabby Shutters" "Iced Spruce"
                                                                                                                      
Copic Markers:   R14, R27, R37, R39   YG03, YG17, YG67    Y18, YR15

Masking Paper:  Inkadinkado Stamping Mask Paper

Embellishment: Nuvo Crystal Gems (included in the kit)


I have also ventured into the world of YouTube and have made a tutorial for this card.


Thanks for dropping by my blog.  Any of your comments, questions or suggestions are always very welcome.


Thursday, August 29, 2019

Open Center Step Card

It has been a while since my last blog post.  I have been using my time learning about Instagram and youtube while continuing to create.  Understand, it is pretty steep learning curve for me and very time consuming.  That being said I am including my first youtube tutorial to this blog.

The card I am sharing today is a step card using the Hero Arts MMH August Kit.


This is the youtube link with the tutorial for creating this fun card.   My first attempt and a tutorial.  I hope you will give me a like on youtube  and leave me some comments and suggestions below.

SUPPLIES:


Die-Namics MFT651 Cross Stitch Oval  ( I don't think this die is available any longer )


Thank very much for dropping by my blog.

As always I welcome your comments, questions and suggestions.

Monday, February 11, 2019

Lawn Fawn Reveal Wheel Cards

Hello everyone!  It has been awhile ... my everyday life has been keeping me away from blogging.  I have been creating but just not getting them posted.  I am back today with 2 cards that I created using my new Lawn Fawn Reveal Wheel dies and some of their whimsical stamps.  I am going to try to simplify my posts so that I will be able to post more often in the future.


This card uses the following:
Stamps:
Dies:  
Coloring: All the coloring for this card including the background was done with Copic Markers.  I added some Glossy Accents for the face mask and bubbles.


My Second Card uses the following:
Coloring and Finishing:  
I created the sofa by drawing it myself onto some Lawn Fawn Plaid Patterned Paper and cutting it out.  I used a matching Copic Marker to added a bit of shading.  The legs of the sofa are added with a black marker as well.
The background is Distress Oxides using a masking and blending technique.  "Tumbled Glass" and "Fossilized Amber"
The other images were colored using Copic markers.


Thank You for dropping by my blog.  Your comments, questions and or suggestions are always welcome.


Monday, October 1, 2018

Sketched Flowers in Autumn Colors

The cards I am sharing today are a few of ones I made using the Simon Says Stamp October Card Kit of the Month.  This kit has been sold out but most of the products in the kit may still be purchased separately.

My first card evolved as I went along.  The background uses two of the alcohol inks from the kit, Sunshine Yellow and Sunset Orange, which I applied using a felt applicator method.
I tried to add the Gina K Foiling to the background by pressing it into the semi dry inked surface.  It did not work as I expected.  I think the sponged background was too dry.  However, I did  discover that I could get the foil to stick very nicely to surface by applying marking pressure.  I used a wooden cuticle stick to add random scribbles to the background.  Hard to see in a photo but very pretty in real life.  
After I was happy with my background.  I used my Misti to stamp the flowers with Versafine Onyx Black ink.  You may notice that the Yupo background moved slightly before my second stamping.  It created a very slight offset of the design which I decided looked fine.  After stamping I used clear embossing powder to heat emboss, being careful not to add too much heat to the Yupo paper.  To finish the image I used Alcohol Inks on small disposable brushes to apply color to the image.  
The thin frame die is a Simon Says Stamp called This is the Life.


The flower image for this card was done in the same way on the Yupo as the first card.  I didn't think my background offered enough contrast so I fussy cut it out.  It is different but I really liked it in the end.  I will be entering this one in the current challenge with the SSS Flickr group, Challenge 107 with guest designer Sally Sherfield.  To embellish and add dimension I added stitched panels for a background with a few scattered gold sequins.


My third card uses an alcohol ink on Yupo background created using the same technique.  For this one I used the foil and cuticle stick to draw in leafy images.   For this card I used the Tim Holtz Ranger Alcohol Lift-Ink Pad from the kit.  The background panel was the second stamping from the lift ink.  I added a strip of 1/8 inch scor tape and applied foil over the tape.
 Thank you for stopping by my blog.  I am always happy see your comments and invite to ask any questions you may have.

Saturday, August 18, 2018

Hero Arts Coffee Lovers Tunnel Card

The Hero Arts My Monthly Kit for August arrived and I was anxious to have some fun with it.   The fancy frame die included this month kit was an immediate favorite.   This die alone makes the price a bargain in my mind.  When I saw this Youtube video from Jennifer McGuire, I was inspired and ready to challenge myself to make an inside tunnel card. 


From the outside the card is sorta fun.  I used a border die from Simon Says Stamp, the DOT SCALLOP BORDER Wafer Die, to make my scalloped background layer.   All of the stamps I used here are included in this month's kit.  I colored the cups with my copic markers and die cut them using the coordinating dies in the kit.  Then, I  coated them with VersaMark embossing ink and used a clear embossing powder to give them a glossy finish.


The MAGIC happens when you open the card to the inside tunnel.   I followed the tutorial from Jennifer but made my card but made a few modifications to create this version.    I typically make my cards A6 size.  This size uses a base of 6"X 9" as opposed to your the commonly used A2 size base of 5 1/2" x 8 1/2".   You will still cut two base cards and cut off  1/2" from the edge of one of  the 6"X 9" base cards and the score line will be at 4 1/2".  The second base card will be scored at 1/2", 4 1/2",and 5".  The inside tunnel panel is cut to 4 1/2" by 6",  you will need to cut a sliver off the 4 1/2" edge. then score it at 1/4" on both sides.   I used the fancy frame die to cut the first layer of my tunnel.  I cut the frame die a second time from a piece to scrap so that I could use just the table and chairs parts for my cafe scene.   To make an opening for the inside tunnel layer, I used a Die-namics Inside & Out Stitched Rounded Rectangle  an lined it up like a window to my cafe.
I added just a touch of coloring to the inside of the tunnel using Distress Oxide Inks, TUMBLED GLASS and ICED SPRUCE.   I added the extra tables to the back side of my inner layer and stamped the sentiment from the kit using the Iced Spruce Distress Oxide ink.
Sounds complicated but it was such fun and worth the effort.  I know this because I am ready to do it again soon.

Thank you for dropping by my blog.   Your comments, questions and suggestions are always very welcome.

Tuesday, July 17, 2018

Summer Memories

The the latest My Monthly Hero Kit brings me back to my childhood.  I grew up in a very rural area in central Missouri, over a 100 miles from either Kansas City or St. Louis.  The traveling fairs that would set up in our small town for a few days were a huge event that we looked forward to each summer.  They meant carnival rides, cotton candy, games and usually fireworks for the 4th of July.  
This one uses the stamps from the kit and a red, white and blue theme.   I put the image on a tag die from Tim Holtz Framelits Tag Collection 658784 that I shorten by about an inch.  I used the inks from the kit and added only a few touches of red and yellow coloring with ZIG Markers.  
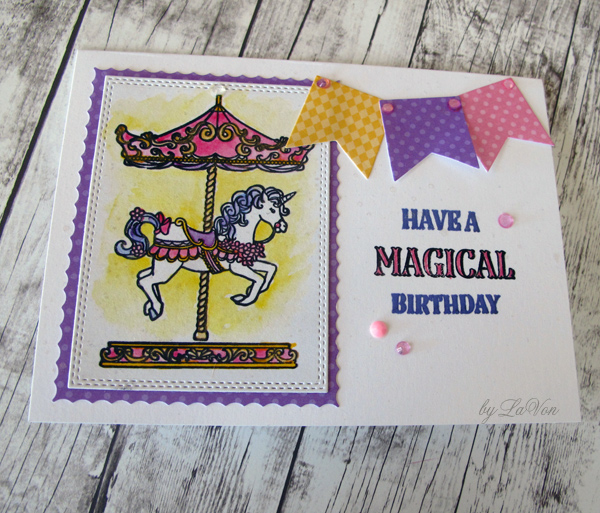
 My second card is shaker card that I made using an add on set from the Hero Arts July release, "Ornate Carousel"  Cm296.    The frame is from a die that I purchased a while back from Amazon and it looks like it is no longer available.  Any square die set could work.   The coloring of the carousel horses was done with the Zig Markers, but I used some Copic markers in the greys and blue to add the floor and sky.


For the third card I used inside cut from the frame die to make my border piece.  The die that I used to cut my image panel from Bristol Paper is from Gina K Designs, Rectangle SM Set Double Stitch .  The coloring for this one done using watercolors.

I added embellishments to the first card with Tonic SILVER MOONDUST Nuvo Glitter Drops and to the third care with Studio Katia CUPID'S KISS Crystals.  
I will be entering my cards in the current challenge with A Blog Named Hero.  The challenge this month is Birthday Cards.

Thank you for dropping into my blog.  Your comments, questions and suggestions are always welcome.


Saturday, June 23, 2018

Beach Time!

The card I am sharing today was made using the June My Monthly Hero Kit and an add on set to create a fun beach scene.  I think this is a perfect card to celebrate the first day of summer and to enter in the current challenge titled "Summertime Fun" over at A Blog Named Hero.  I am also adding this one the Simon Says Stamp Wednesday Challenge.  The theme is "Bright and Cheerful" and the highlighted product line this week happens to be Hero Arts.

Sadly, the June My Monthly Hero Kit is sold out but the add-on set "Beach Please Stamp and Cut DC238 that I used for this card is still available.  As you might see I had a lot of fun creating this summer fun card.  The beach embossing powder that was part of the monthly kit was perfect for creating the sandy beach scene.   Everything here was from Hero Arts with the exception of the "Stitched Banner" die from SSS and my copic markers used for coloring the image.                                                                                                                                                                                                                                                                                                                                                                                                                                 
Our dog Rory's favorite thing in the world is a trip to "the sandy place".  That for us is a beach on the shore of Lake Michigan.  We don't dare say the word "beach" in his hearing because he knows what the word means and just get super excited.

Here is a picture taken with him wearing his "Doggles" making the trip down to the Dog Beach in Chicago where he will swim and fetch until he has exhausted himself.


Hope you all enjoy your summer as much as Rory.  
Thank you for visiting my blog.  Your comments are always very welcome.